
Condition-Specific Pain Management
4 Steps to Apply Ice on Sprained Ankle for Pain Relief

Introduction
If you’ve ever sprained your ankle, you know how painful and frustrating it can be. You’re not alone in feeling unsure about how to treat it effectively. Applying ice to a sprained ankle is a trusted method for easing pain and reducing swelling. Knowing how to apply ice correctly can bring you comfort and help you heal faster, easing your pain and swelling.
But you might wonder, how can you make sure you’re using ice safely and effectively? This guide will walk you through the essential steps for applying ice to a sprained ankle. With the right steps, you can feel more confident in your recovery journey, knowing that relief is within reach.
Understand the Benefits of Ice Application for Sprained Ankles
If you’ve ever sprained your ankle, you know how frustrating and painful it can be. Applying ice on a sprained ankle can help reduce swelling and numb the pain, making it a common first step in managing this injury. Ice works by narrowing blood vessels, which decreases blood flow to the area, providing immediate relief. It can also help ease muscle spasms and prevent further injury by limiting movement in the affected region.
You might be wondering if icing is truly the best option for your recovery. While ice can alleviate discomfort, some experts believe that too much icing might actually slow down the healing process. It’s important to find the right balance. For instance, Dr. Gabe Mirkin, who first introduced the RICE method, has suggested that ice may hinder recovery in some cases.
It’s often suggested to apply ice on a sprained ankle during the first few days after an injury to help with swelling and pain. However, gentle movement can also help you heal faster, so don’t be afraid to start moving a little as you feel ready. Activities like walking or biking can improve blood flow to the injured area without causing more pain.
Many people find that slowly getting back to their normal activities helps them heal more quickly. The PRICE method (Protection, Rest, Ice, Compression, Elevation) emphasizes the use of ice on sprained ankle to effectively stabilize the joint and reduce swelling, highlighting the importance of a well-rounded approach to injury management. By learning how to use ice wisely, you can take an important step toward feeling better and getting back to your activities.

Gather Necessary Materials for Ice Application
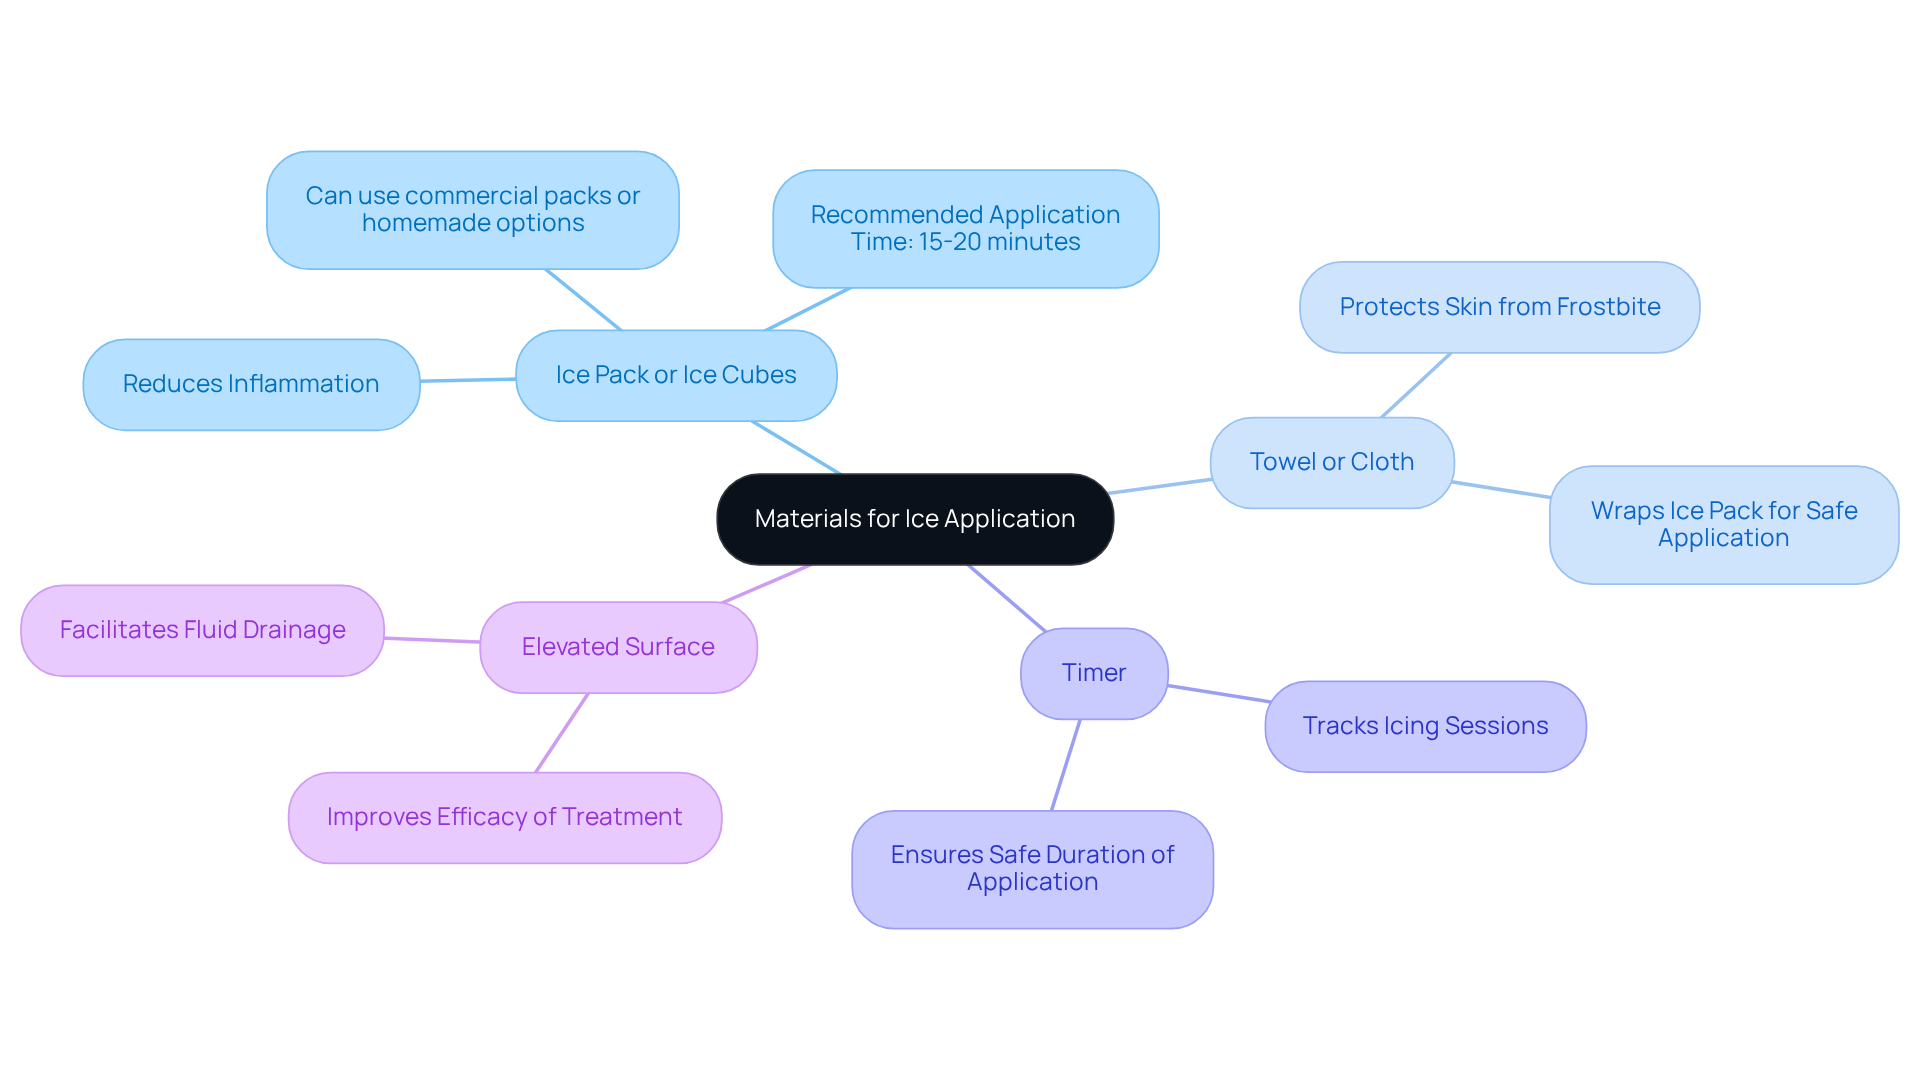
Applying ice on a sprained ankle can feel daunting, but with the right materials, you can manage your recovery effectively. Gather these essential items to get started:
- Ice Pack or Ice Cubes: You can use a commercial ice pack, a bag of frozen peas, or make your own by placing ice cubes in a plastic bag. Using ice on a sprained ankle is key to reducing inflammation and discomfort. We recommend applying ice on a sprained ankle for 15 to 20 minutes at a time to help ease your pain and discomfort.
- Towel or Cloth: We understand that protecting your skin is crucial, so be sure to wrap the ice pack in a thin towel. This prevents direct contact with your skin and helps avoid frostbite.
- Timer: Using a timer can help you keep track of your icing sessions, ensuring you get the most benefit without risking skin damage. Icing, or applying ice on a sprained ankle, should be repeated every 2 to 3 hours during the initial days for effective management of inflammation.
- Elevated Surface: Use a chair or couch to raise your foot above heart level while icing. Elevation improves the efficacy of the treatment by facilitating fluid drainage and minimizing inflammation, which is a key aspect of the RICE method.
Having these materials ready will streamline the process, allowing you to focus on applying ice correctly and effectively managing your recovery. Remember, leaving ice on a sprained ankle for too long can cause skin damage and increased blood flow, which can hinder your recovery. Taking these simple steps can make a significant difference in your healing journey.
Apply Ice Correctly to Your Sprained Ankle
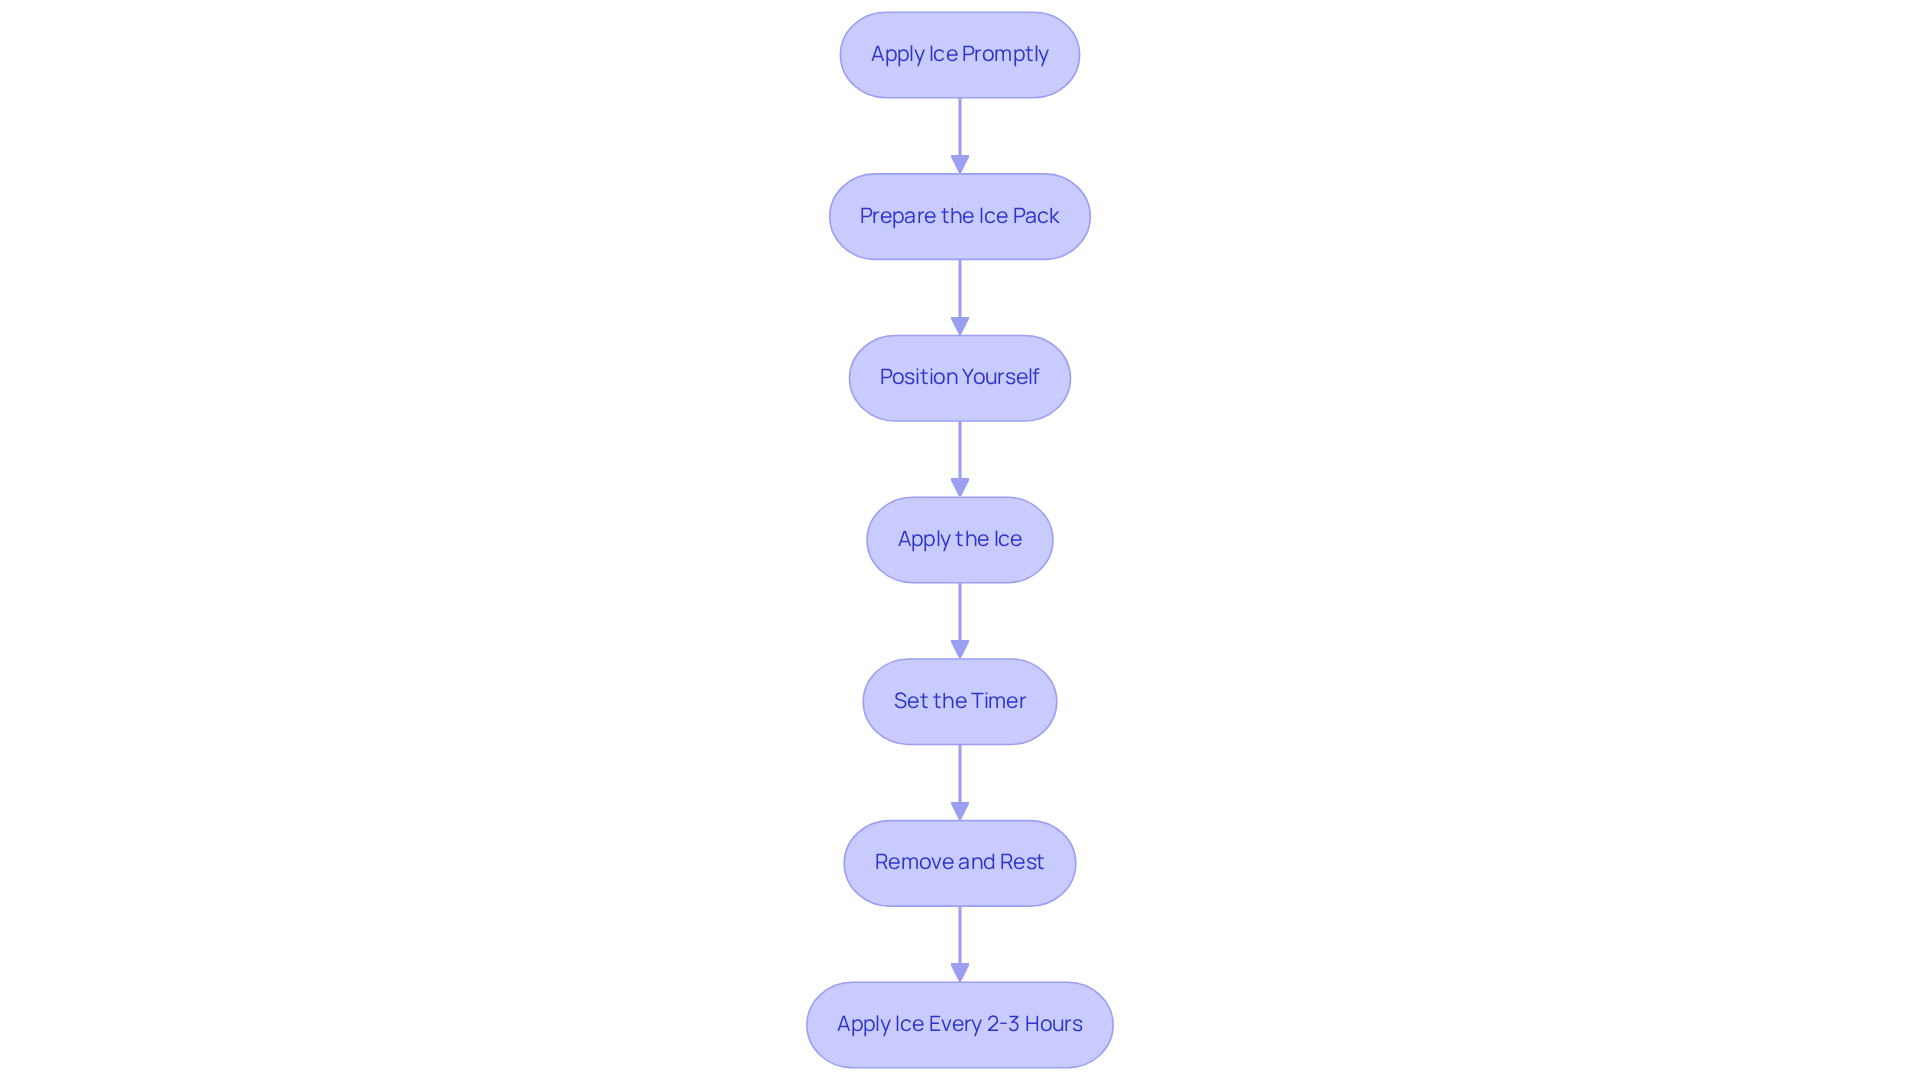
Dealing with a sprained ankle can be frustrating and painful, leaving you unsure of how to find relief. To effectively apply ice to your sprained ankle, follow these steps:
- Apply Ice Promptly: It’s best to apply ice right away. As soon as the injury occurs, apply ice on the sprained ankle or a cold pack to minimize inflammation and alleviate discomfort. This is crucial for maximizing the effectiveness of ice application.
- Prepare the Ice Pack: Use ice cubes in a plastic bag wrapped in a thin towel, or ensure your gel pack is at the right temperature.
- Position Yourself: Sit comfortably with your injured joint elevated on a chair or couch to assist in minimizing inflammation.
- Apply the Ice: Place the wrapped ice pack directly over the sprained area, ensuring the cloth is snug but not too tight to avoid restricting circulation.
- Set the Timer: Apply the ice for 10 to 20 minutes, three or more times a day. Use a timer to prevent overexposure, which can lead to frostbite.
- Remove and Rest: After the time is up, take off the ice pack and allow your skin to return to normal temperature for at least 1 hour before reapplying.
- To enhance relief and reduce inflammation, apply ice on sprained ankle every 2 to 3 hours for the initial 48 hours after the injury.
Additionally, remember the RICE protocol (Rest, Ice, Compression, Elevation) for comprehensive injury management. If discomfort or inflammation does not improve after a few days, consult a healthcare provider for further guidance. Taking these steps can make a significant difference in your recovery, allowing you to return to your daily activities sooner.
Troubleshoot Common Issues During Ice Application
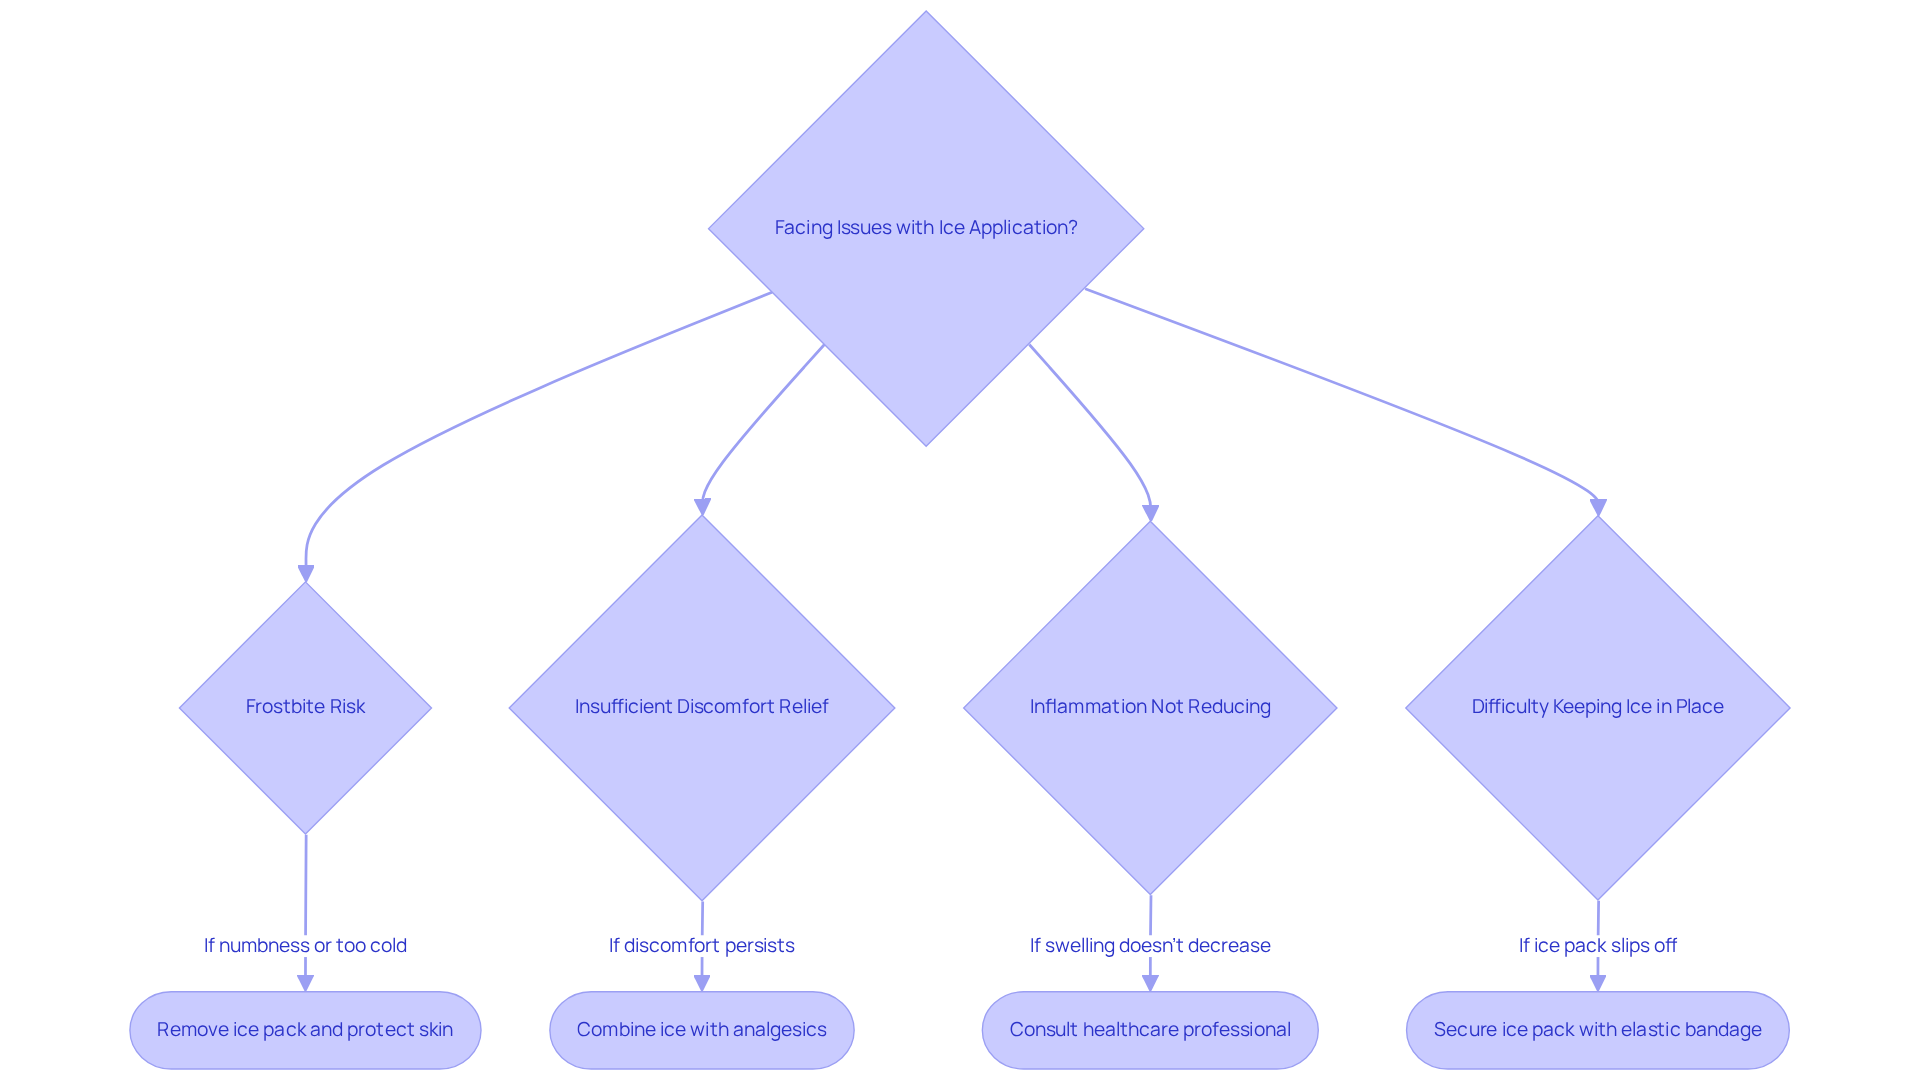
Applying ice on a sprained ankle can sometimes lead to unexpected challenges, but you’re not alone in this journey. Here’s how to troubleshoot them effectively:
- Frostbite Risk: If you notice any numbness or feel too cold, gently take off the ice pack to protect your skin. Always use a cloth barrier to shield your skin from direct contact with the ice on sprained ankle, as prolonged exposure can lead to cold-related injuries.
- Insufficient Discomfort Relief: If you’re still feeling discomfort after icing, it’s okay to seek additional relief. Consider combining ice application with over-the-counter analgesics, like ibuprofen, as directed. This dual approach can enhance pain management during the initial recovery phase.
- Inflammation not reducing: If swelling doesn’t decrease after 48 hours of using ice on sprained ankle, it’s a good idea to reach out to a healthcare professional. Ignoring this could lead to more serious injuries that need attention.
- Difficulty Keeping Ice in Place: If the ice pack slips off, use an elastic bandage to gently secure it around your ankle. Make sure the bandage is snug but not so tight that it restricts blood flow, as proper circulation is crucial for healing.
By being aware of these potential issues and knowing how to address them, you can take proactive steps to ensure a smoother recovery process.
Conclusion
Managing a sprained ankle can feel daunting, but knowing how to apply ice effectively can make a world of difference. Applying ice to a sprained ankle is a crucial step in managing pain and reducing swelling. Following these simple steps can help ease your pain and support your healing. The importance of timely application, proper materials, and adherence to recommended durations cannot be overstated, as these factors collectively contribute to a successful recovery process.
We know it can be overwhelming to keep track of everything when you’re in pain, but we’re here to help. Key insights shared throughout the article highlight the benefits of ice application, the necessary materials for effective treatment, and troubleshooting common issues that may arise during the process. Emphasizing the RICE method – Rest, Ice, Compression, and Elevation – provides a comprehensive framework for managing sprained ankles. Additionally, recognizing the balance between ice application and gentle movement can further facilitate healing, allowing you to return to your daily activities more swiftly.
Ultimately, understanding how to apply ice correctly not only aids in immediate pain relief but also sets the foundation for long-term recovery. With the right approach, you can feel better and get back to your life sooner. By taking these steps and being aware of what might come up, you can feel more in control of your healing journey. Remember, taking these steps can empower you on your healing journey, and you don’t have to face it alone.
Frequently Asked Questions
What is the primary benefit of applying ice to a sprained ankle?
Applying ice to a sprained ankle helps reduce swelling and numb the pain by narrowing blood vessels, which decreases blood flow to the area.
How does ice application affect muscle spasms and movement?
Ice application can ease muscle spasms and prevent further injury by limiting movement in the affected region.
Is icing the best option for recovery from a sprained ankle?
While icing can alleviate discomfort, some experts, including Dr. Gabe Mirkin, suggest that excessive icing may hinder recovery, indicating the need for a balanced approach.
When should ice be applied to a sprained ankle?
Ice is often suggested to be applied during the first few days after an injury to help with swelling and pain.
Can movement aid in the recovery of a sprained ankle?
Yes, gentle movement can help heal faster. Activities like walking or biking can improve blood flow to the injured area without causing additional pain.
What is the PRICE method in relation to sprained ankles?
The PRICE method stands for Protection, Rest, Ice, Compression, and Elevation, emphasizing a well-rounded approach to stabilize the joint and reduce swelling.
How can one effectively use ice for a sprained ankle?
By learning how to use ice wisely, individuals can take an important step toward feeling better and returning to their activities.
List of Sources
- Understand the Benefits of Ice Application for Sprained Ankles
- Gather Necessary Materials for Ice Application
- Apply Ice Correctly to Your Sprained Ankle
- Troubleshoot Common Issues During Ice Application
- Here’s How Long To Ice an Injury
- Ice vs. Heat for Sports Injuries: Which Is Better?
- When To Use Ice Or Heat: Treating Strains, Sprains and Other Injuries – Orthopedic Surgeon
- When to use ice or heat on an injury | OSF HealthCare
- To Ice or Not to Ice a Sprained Ankle | Panorama Orthopedics in Denver & Centennial, CO
Living with this?
We treat this in Ponte Vedra Beach.
Dr. Eli Loch, D.O. — double board-certified in anesthesiology and pain medicine. Reading about it only goes so far; a diagnosis tells you which of these actually applies to you.